I've been looking around to see if I could find a nice basket for my glass table I talked about in my previous blog here.

This is a table I had painted some time back and occasionally whenever I was out shopping I tried to remember to look for the perfect basket. I wanted something like this.
 |
| Source: CoffeeTablesGalore.com |
Unfortunately, everything I saw was either too short, too long, too wide or too expensive!
Then one day a very dear friend bought me a set of stoneware, something I needed desperately, but most importantly it came in a box!

I know you're wondering why I'm excited about a box, but I figured if I couldn't find the perfect basket, perhaps I could substitute it for a box. Will I be wrong for saying I appreciated the box more than the gift???
Here's what I did.
First, I tucked the flaps inside and wrapped paper around the box - this was to make sure the black didn't show through.
First, I tucked the flaps inside and wrapped paper around the box - this was to make sure the black didn't show through.

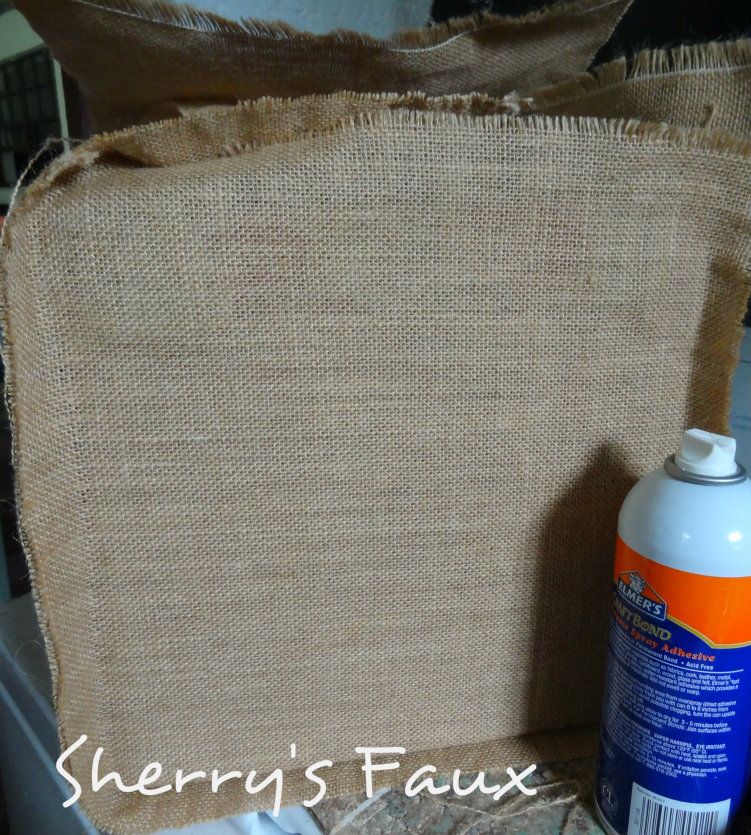
I then took some fabric and used it for the lining

If you think you saw this fabric before you did. I used it for my planter here and my dining room chairs here, and I still have tons left!
I then cut two long strips of burlap to cover the box. Oops, I forgot to mention I used spray adhesive to adhere the paper, lining & burlap to the box.
Oh, I also realized the spray adhesive stiffens the fabric and prevents raveling so you don't have to worry about raw edges raveling or raveling too much! Gotta luv that stuff, it makes everything super simple!
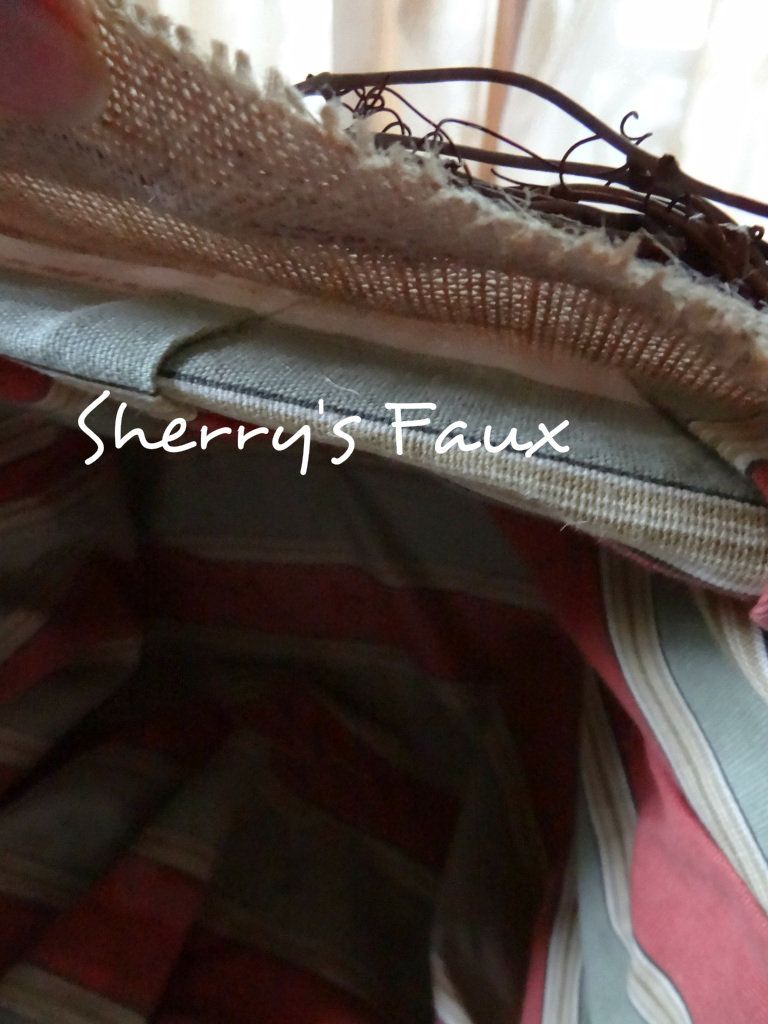
I made sure all four of the sides were sprayed to prevent unnecessary raveling, but I left the top unglued for now.
Sometime ago I came across these dried vines at Home Fabric

I'm sure I can find this stuff in my yard, but the bunch was for $9 so I decided to purchase.
I took some of the dried vines twisted a few together and sewed them around the upper portion of the box. When that was done, I hot glued the fabric down; the twigs can add a lot of weight and I wanted to make sure they didn't pull the fabric down.
Once that was done, I pulled some threads on top to give it that ragged ravel-y look. and then sprayed it with adhesive to stiffen it and to prevent unnecessary raveling.
I wanted to apply a stencil, but I didn't have any fabric glue, so after some thought I decided to make my own.
I wanted to apply a stencil, but I didn't have any fabric glue, so after some thought I decided to make my own.

Here's the end product


BEFORE
AFTER

I am so happy with the end product - a lovely decorative fabric covered box, super simple, super quick...LET YOUR CREATIVITY FLOW!
You managed to make THAT from a simple BOX?!?! Wow!!! And, I love your stencil!
ReplyDeleteA masterful idea! I love the variety of texture with the colorful smooth fabric inside and burlap outside. Those twigs are like icing on a delicious cake. You are so creative!
ReplyDeleteLiz
Great idea Sherry. Looks good!
ReplyDeleteWow, Sherry, I love it! It's really perfect for that table. Great job.
ReplyDeleteYour creativity is truly remarkable! That looks beautiful, Sherry!
ReplyDeleteLove it! Wow what a before and after! The stencil is beautiful and so neat! X
ReplyDeleteWow, I love how you think outside the 'box' (pun intended!) Great make and the stencil is lovely.
ReplyDeleteI love your pretty stencil design!
ReplyDeleteOh my, what an amazing transformation! You are incredibly talented! You've done wonders to that box...I absolutely love that stencil on burlap and the vine edging,looks so much better than an ordinary basket. Beautiful job! Thanks for inspiring us and for your wonderfully encouraging words:)Happy Sunday!~Poppy
ReplyDeleteHI Sherry! Oh, there you go being awesome again! What a wonderful project and it looks fantastic!
ReplyDeleteBe a sweetie,
Shelia :)
Sherry,
ReplyDeleteOnly you could make cardboard look fabulous!
Kelly
I have been saving up some sturdy boxes to recover, but they weren't going to look like this...but they just might now! ;) I LOVE how this looks Sherry!
ReplyDeleteSo creative. I wish I had time and courage to do things like this. It looks great and I'm looking forward to following you.
ReplyDeleteHave a great night.
Tammy
Hi Sherry,
ReplyDeleteYour so clever and smart. I love how you transformed the box.
Dee
Wow! I think you could transform just about anything. I will never look at a plain box the same way again. I guess there is always potential for something greater. Thanks for your sweet comments on my posts about my vintage finds.
ReplyDeleteSherry, love your storage box! Burlap matches with everything and love the natural look it gives. Think my favorite is the stencil, it looks great!
ReplyDeleteSherry....that is just awesome! I love that you made your own when you couldn't find the right size. I really love the tip about the spray adhesive preventing unraveling too! I think this is genius!
ReplyDeleteHow cool is that!! I love what you did with the box. I need to search the garage for empty boxes to make pretty, like you did.
ReplyDeleteWhat a lovely and clever way to do a box, you have done it perfectly, it looks wonderful, I love your work.
ReplyDeleteThis reminds me of my first set of tables after college - they were tied-dyed muslin fabric wrapped around my moving boxes. You have elevated this puny idea into decorator heights. I love the rough texture of the fabric and twigs! Came over from Whatever Goes!
ReplyDeleteDistressed Donna Down Home
What an incredible idea! I love this so much. I can't believe that it's a cardboard box. You always have the best ideas.
ReplyDeleteHave a wonderful day!
karianne
Wow...can I say I love your box. I love anything burlap too so that's a plus. But Iespecially love how you did the corners. very creative! I found you from a blog hop and am now a follower!
ReplyDeleteNo way you turned that box into a gorgeous decorative basket!!! That's so impressive, very well done!
ReplyDeletewow it's so lovely
ReplyDeletegood post dear
keep sharing
check and do comment on my recent post
http://glamorousgirlblog.blogspot.com/2012/06/oasap-buckle-strap-detail-vintage-2way.html
You are just crazy talented Sherry! That is such a great look on all three pieces, but I love the box the best! : )..
ReplyDeleteOMG Sherry!!! I can't believe the stuff you make!!! You are amazing!!!
ReplyDeleteYou are too crafty! Thanks for linkin up! Can't wait to see what you come up with next!
ReplyDeleteKim@madeinaday