A friend of mine was browsing through my blog and saw where I had painted my bathroom faucets. She was considering about painting hers but wanted to know how mine were holding out. So, here's my update - 1 year later.
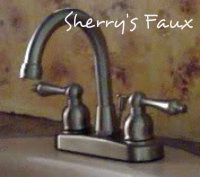
This was my faucet before
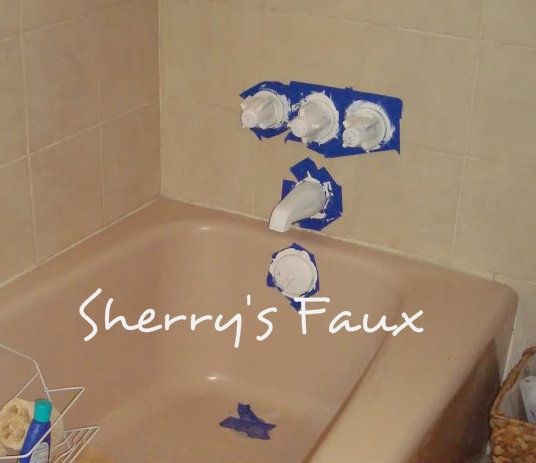
About a year ago I had been looking for a bronze faucet for my tub, mine had lots of mineral deposits built up on it and needed to be changed. In the Bahamas it's difficult finding really nice triple handle tub & shower sets, the only thing available were those cheap looking shiny chrome faucets with the clear knobs. Anyways, I was complaining to my sister and she suggested I try painting mine. What could it hurt?
This was going to be a temporary fix (3-6 months) just until I could find something classy!

Well after 1 year of use, they're still holding. I used Zinnser primer shellac based, Modern Masters Statutory Bronze metallic paint and Zinnser polyurethane as a sealer. The process was simple:
I waited 7 days before using the fixtures, assuming that was enough time for curing.
Surprisingly, they're still holding up after 1 year of use. Yep, these babies get used every day (365 days) - the tub usually twice a day & the sink constantly! These pictures were taken yesterday.
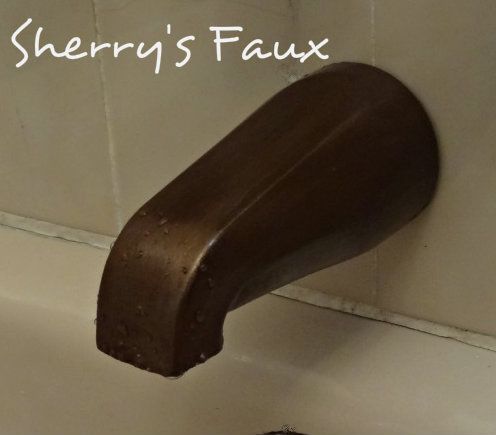
Because our water is so hard over here, I try to make a conscious effort to keep the faucets wiped down after use, this helps to reduce build up of deposits.


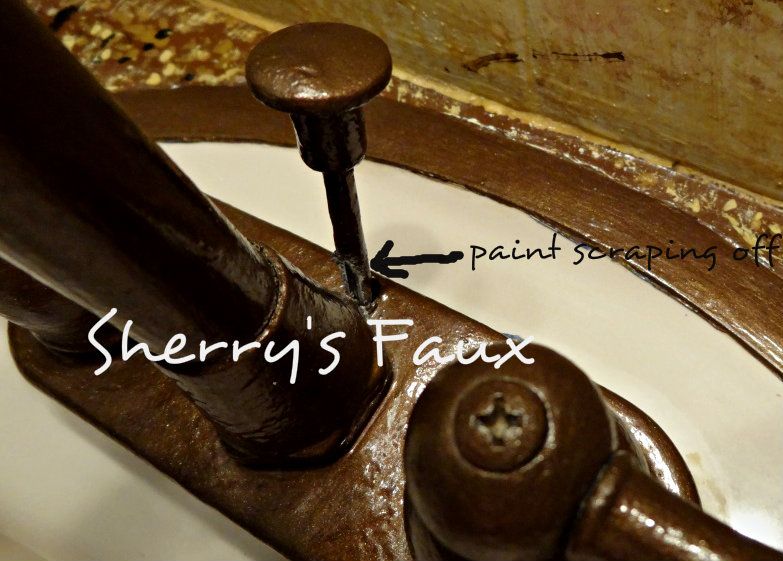
You can see below where I also painted the rim of the basin.

I've only had one problem, you can see below where some of the paint scraped off, but I guess that was to be expected. Actually, it's not even noticeable unless you stick your head back there.
So, what was suppose to be a temporary fix, is now going into it's second year. Would I do it again? Yes! But I would do things differently. Painting fixtures while still attached to a basin or tub is tedious work. It would have been much easier if I could have just spray painted them outside, no taping and less clean up afterwards. Hmmm, I wonder if it'll hold up for another year? If so, I'll definitely give an update. LET YOUR CREATIVITY FLOW!
This was my faucet before
About a year ago I had been looking for a bronze faucet for my tub, mine had lots of mineral deposits built up on it and needed to be changed. In the Bahamas it's difficult finding really nice triple handle tub & shower sets, the only thing available were those cheap looking shiny chrome faucets with the clear knobs. Anyways, I was complaining to my sister and she suggested I try painting mine. What could it hurt?
This was going to be a temporary fix (3-6 months) just until I could find something classy!
Well after 1 year of use, they're still holding. I used Zinnser primer shellac based, Modern Masters Statutory Bronze metallic paint and Zinnser polyurethane as a sealer. The process was simple:
- Sand faucets lightly to give it some tooth (I had lots of mineral deposit built up on mine so it took lots & lots of sanding to get it down)
- Prime, let dry then sand; prime, let dry then sand (check the can to see how long you should wait before sanding, I think I waited about 3-4 hours after my first priming)
- Paint, wait 12 hours, then sand (I repeated this step 3 times)
- Seal with polyurethane, wait 6 hours, then sand (I continued this step about 6 times)
I waited 7 days before using the fixtures, assuming that was enough time for curing.
Surprisingly, they're still holding up after 1 year of use. Yep, these babies get used every day (365 days) - the tub usually twice a day & the sink constantly! These pictures were taken yesterday.
Because our water is so hard over here, I try to make a conscious effort to keep the faucets wiped down after use, this helps to reduce build up of deposits.
You can see below where I also painted the rim of the basin.
I've only had one problem, you can see below where some of the paint scraped off, but I guess that was to be expected. Actually, it's not even noticeable unless you stick your head back there.
So, what was suppose to be a temporary fix, is now going into it's second year. Would I do it again? Yes! But I would do things differently. Painting fixtures while still attached to a basin or tub is tedious work. It would have been much easier if I could have just spray painted them outside, no taping and less clean up afterwards. Hmmm, I wonder if it'll hold up for another year? If so, I'll definitely give an update. LET YOUR CREATIVITY FLOW!
17 comments:
That's amazing!! I've never seen anyone do this and it was the perfect fix! They look so much more "high end" in this color!
That's great that they are still holding up 2 years later.
Surprised they lasted that long, the copper/bronze finish looks so majestic. Way better then the chrome and ugly silvers we're sold.
-Solomon Berkovitch
Shower Enclosures Brooklyn
that is really awesome! I love the bronze color!
For what started as a temporary fix, it looks AMAZING. I would never have thought to do that..but I would never have though to make over a shoebox either, both of which you have done with some beautiful results.
Great job, Sherry. I think the trick was in letting them "cure". They still look wonderful- xo Diana
That is so cool! We just bought new bronze fixtures and they were really much pricier. Is that a word? Anyways, what a great way to make them look so pretty. I think your sister and you are very clever!
Blessings,
Susie
What a fab idea! This is my first, I will have to remember the steps you listed...Your ideas are always so useful. Thanks much!
Looks great!
Love it!!!!!!!!! That was genius! My poor bathroom.....I hope to show it snow love this winter.
Wow, Seriously, Sherry, this is pretty amazing. It's really good of you to come back and give us all a progress report. Yes, I have to admit, it's a real game changer to be able to paint bathroom taps instead of changing them (Those plastic ones with the clear knobs are pretty horrible.I know because I have them, No vintage charm there) You did a really good job here. Is there anything you can't do with paint?
It turned out great and is lasting well. My bathroom is longing for some attention.
Very cool! I would have never thought to do this. I am astounded by how expensive faucets can be.
That's amazing!! I never thought paint would hold up on fixtures that are constantly exposed to water. Thanks for the update!
They still look amazing - what a fabulous fix!
Kelly
What a fabulously clever idea, I would have never even thought of this! I have an old faucet in the bathroom and will definitely give this a try...Yep, you are a genius!!
Carol
Looks great now
http://glamorousgirlblog.blogspot.com/
Post a Comment