While visiting my sister over Thanksgiving Holiday she showed me a cardboard box that she had and wanted to know if we could do something with it. I know you're probably saying "what the heck?" but this is Decorating with Cents...plus I get a thrill making something out of nothing. (smile)
This was one of those strong sturdy boxes that computers are often shipped in.
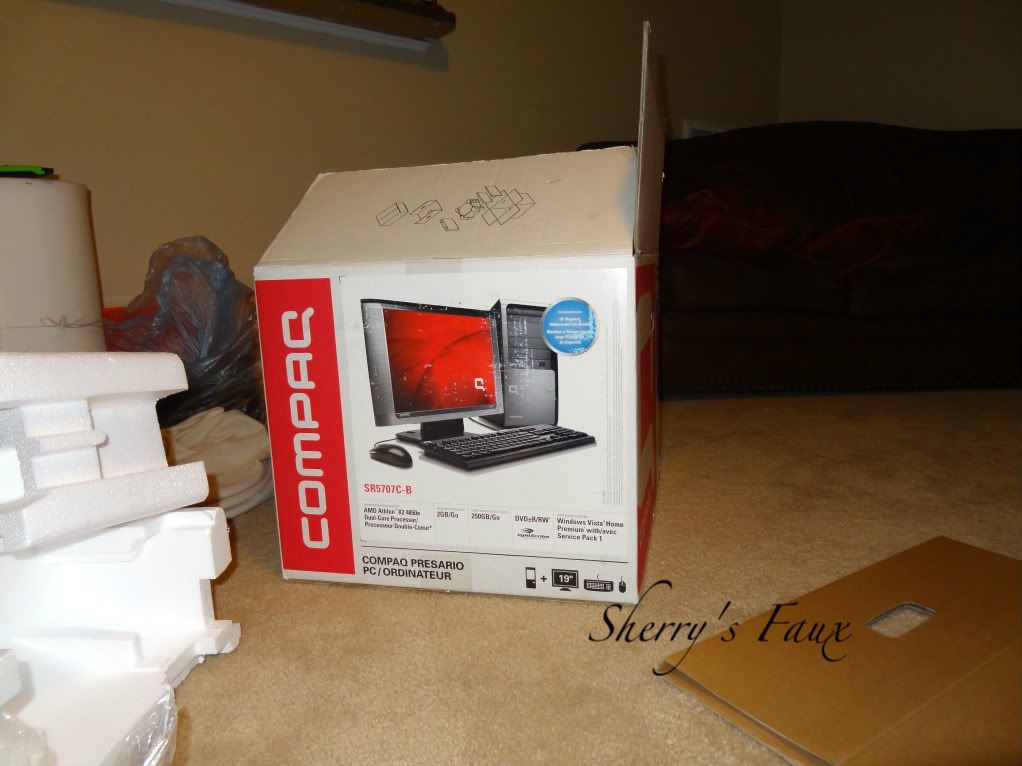
My first thought was to perhaps spray paint it, but then what? Besides who wants to waste their time painting a huge box like that? Plus it was glossy which meant priming first, and prime is too expensive to waste... anyways while playing around with ideas my sister just happen to stumble on another box, same height & durability, that she wanted to use. So, now we have 2 boxes to play with, yippie. How did she not know there was another gigantic box in her house???
Okay, getting back on track, we now have two boxes to play with. Oh, did I forget to mention I was on vacation and should have been getting some good ole R&R?
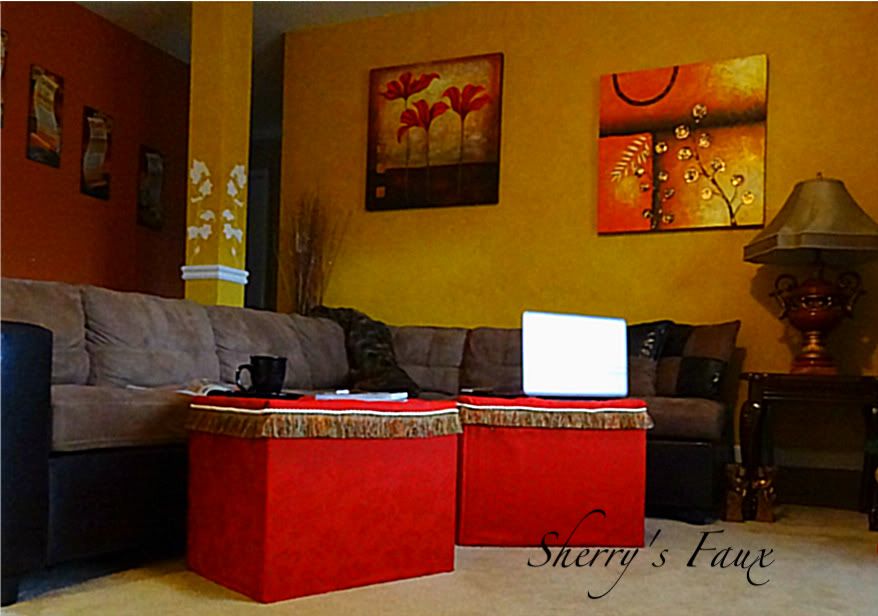
Well this is what I came up with...

You like??? If I had shown this to you earlier would you have known it was an old box?
It didn't cost much to complete this project. She found the fabric on sale $8 total; fringe $6; decorative rope $8; foam $5. She was getting so excited over purchasing items for her cubes that I had to constantly remind her it was a cardboard box, and we didn't want to spend much on it....
Here's what I did,
I reinforced the inside with the styro that came in the box...just to give it a little more strength, you know, just in case somebody decided to sit on it.
 |
| Styro was taped around all four sides to give additional strength |
Then I used spray adhesive to glue the fabric to the box (gives it a smooth finish). This was my first time using this and I totally fell in love with it. It made everything go quick, quick, quick.

Measure cushion and cut out to cover. I also used spray adhesive to glue fabric onto foam. So far, this is like super easy.


Everything was going smoothly until I got to the tucking. I couldn't figure out how to do it so after an hour or two of mental anguish I had to go to bed and think about it (I think best when I'm either eating or sleeping) - seriously.
Now because I wasn't sure how this was going to work, and then when it did work I got so excited I was afraid to stop and take a picture because I didn't want to forget how I did it. Let me see if I can explain...
First I measured to see where I wanted the tucks and used a pencil to mark the spot on top. Then I cut a small piece of cardboard (1"x1") and held it at the bottom of the foam, directly beneath the spot I had marked. This cardboard would give the support for tucking when the thread is pulled through. I then took a threaded needle (starting from bottom of cushion) pushed the needle straight up through the cardboard that I was holding under the cushion and through the fabric into the pencil mark on fabric. Then I brought the needle back down through the fabric & cardboard I pulled it tightly which caused it to start gathering, hey, my first tuck!

I did this several times in each spot just to make sure it was firmly tacked.
Once I completed the tucking I sprayed the top of the box and placed the cushion on top of it. Then came the fringe. I used fabric glue to adhere the fringe but when I went to put the rope on top of the fringe, I encountered a problem. I guess the roping was to heavy and it wouldn't stick. So after some frustration, my sister suggested hot gluing it (I hate using hot glue, because I'm always burning my fingers) but it worked like a breeze and yes I did burn my fingers!
This is a temporary fix until she decides on purchasing something more functional, but until then this is excellent for holding platters of food, kicking your feet up while lounging, etc. While I was there she had several guests who came in and they plopped their butt right on top of it, thankfully the


So tell me, what will you do the next time you get a box? Just LET YOUR CREATIVITY FLOW!
30 comments:
Brilliant!!!! This really is decorating with cents/sense!!
So clever! I love it! I will think about a big box as something more than a toy for my kids next time!!
Wow! I never would have guessed! You and your sis did a marvelous job!
Wow! Those look incredible! Thanks so much for participating in our challenge! I cannot wait to see what you create and what your "impossible" is!
blessings,
karianne
Sherry,
I'm sitting here with a giant question mark over my head because that is just crazy creative! Wow!
And I was so thrilled to see the "Imagine the Impossibilities" challenge button on your sidebar! So glad you'll be joining us in the challenge. Seriously, after this cardboard box post, I cannot wait to see what you bring ...
xo
Linda
itallstartedwithpaint@gmail.com
Sherry - that really is brilliant - no one would ever have known what they started out as! Amazing!
Peggy
Hi Sherry, what an awesome idea! They are beautiful, I love the tucks and the colors! Great job! Hugs
I absolutely love this! This is my kind of decorating! Thinking outside the box.. well sort of LOL!
Sherry's Bees Nest
WOW....those are AWESOME! Great job Sherry!
Sherry, I was dancing in my seat throughout this entire post. I love your creative spirit. They look fantastic.
I am impressed! You put my creativity to shame...You are very creative! I am now following you too...
Thanks for visiting my dollys designs
I have three blogs so signature is from Hibiscus House...
Very creative idea. You would never know it started out as a box!
Really adorable.. Very neat idea.. I LOVE them..;)) Thanks SO much for sharing..;))
Your blog is so you after reading this post. So impressed by this, you are incredibly creative. They turned out so very beautiful and inexpensive. Thanks for sharing your inspiration at Sunday's Best!
What an amazing idea! They look great! Thanks for stopping by my blog & for the sweet comment...I really appreciate it!
Sally
loveofhomes.blogspot.com
Shery, you've just received an award from me! Congrats! Check this out on my blog!
Love, Olga
www.stardust-decorstyle.blogspot.com
Amazing! You're one creative girl! What an fabulous transformation! Thanks for sharing such a great tutorial! I'm a new follower! I can't wait to see more of your creative ideas!
Great job on putting these together. Would never thought it was a box. Thanks for stopping by my blog and taking the time to comment. I'm your newest follower. I have a feeling you'll be great inspiration :)
Just brilliant, I would have let my kitty play in the box. We have a kiddo in college (third year) and after reading your profile we are in much the same place. hugs♥olive
Maybe I should think twice before I send all of the cardboard to the recycle bin. Very Creative!
That was simply clever. Thank you so much for sharing.
Holy Cow ! What a project ! You would never guess they were boxes . Great job Sherry !
Dawn @ Making Home
Sherry you never cease to amaze! They look great!
I think I'm speechless... Never would have guessed that was a cardboard box!!!! Wow, and how funny you had to keep reminder your sis it was a box!!! I love the way you think - much like me - don't wanna prime if we don't have to since that is costly stuff! haha. I'm with you girl!!! Thanks so much for sharing on my Korner.
WOW that is a great idea. Stopping by from the Make My Morning Blog hop. would love a follow back http://blessedchick-trythis.blogspot.com
Stopping by from Make My Morning -- just came by to say HI but seeing this fabulously creative and clever project I'd like to add an invitation. I would love it if you would come link up with Busy Monday (open Monday through Thursdays) at A Pinch of Joy, a linky party for ideas that make life better, easier and more fun!
No way! This is amazing!!!! I love your creativity! I'm a new follower from the make my morning blog hop!
Can't wait to hear more from you!
Brie @ BreezyPinkDaisies
I did this with a wooden crate one time it lasted forever. I used a sturdy corduroy on it.
Yours is so fancy. Very elegant.
Great job.
I am your newest Linky Follower from the Linky Follower Party Hop.
Well, those boxes look really great, you're an artist, you are! I'm your newest Linky follower and would love a link back. Thanks, Mary
Sherry, you are amazing. Love love love the 100% eco-friendly nature of your ingenuityyy!!!!
::
I am actually coming to your site re. the FOLLOWER linky blog hop. *** I am now following you **** Will you follow me back?? *** Thank you so much when you do.
PLUS: There is also a party on our blog, where you can feature 'your best creative work'. There are some great projects to see already, but we want to see your work!
Anyhow, use this link both to FOLLOW and to PARTY:
http://www.FineCraftGuild.com/party/
Hope to seeing you around!!
Have a happy, creative day!
Post a Comment